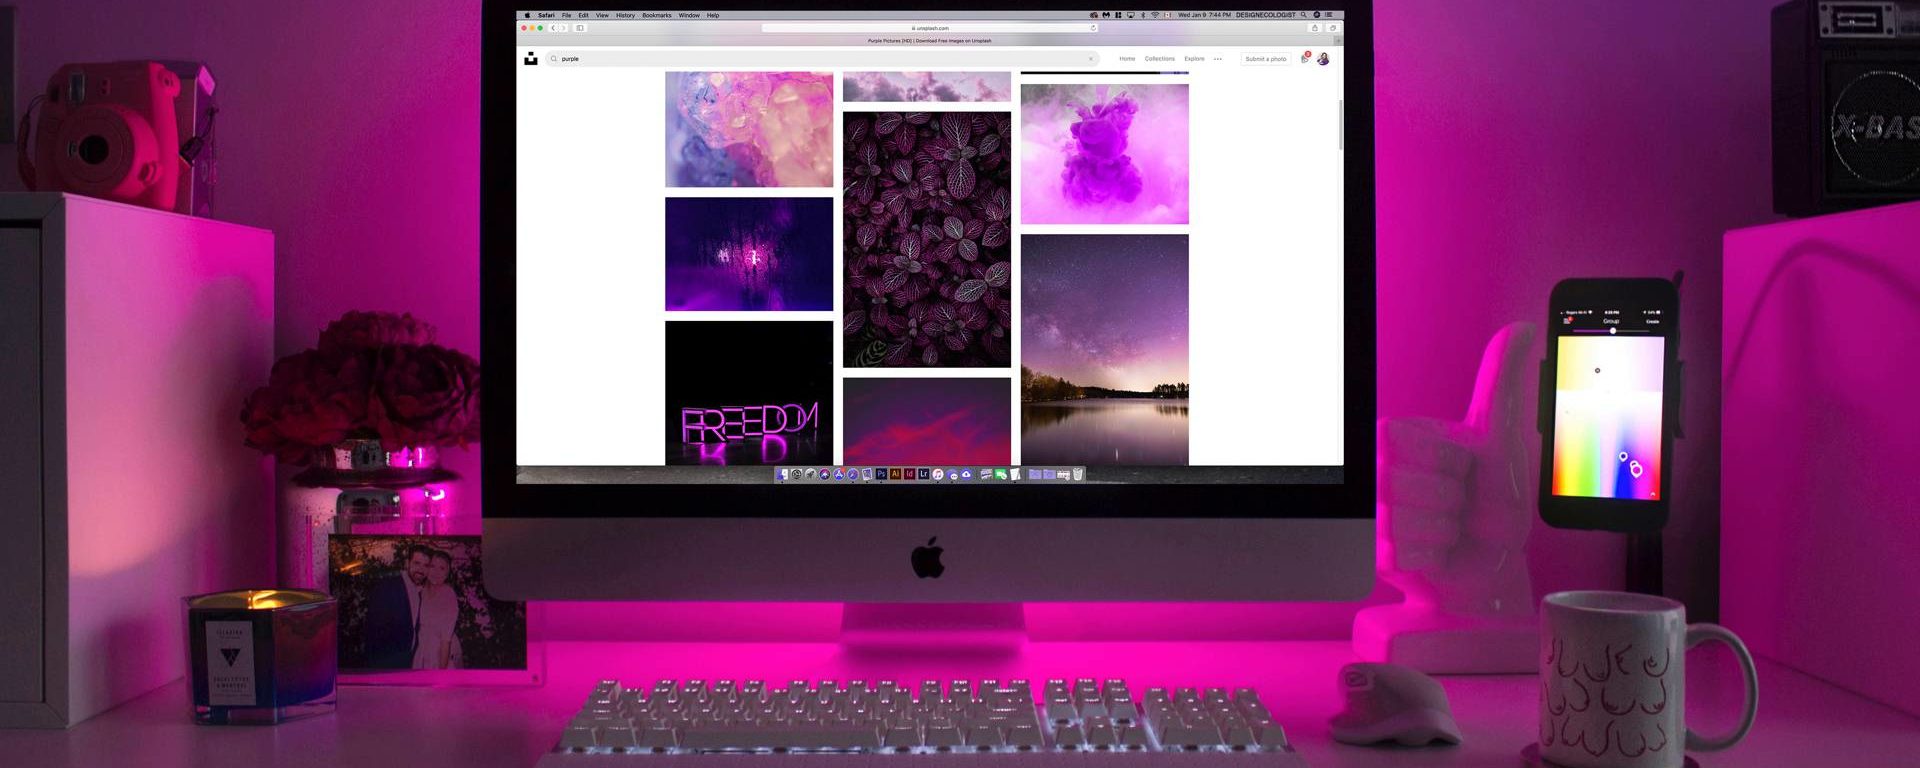
Thinking of learning how to edit photos to enhance your images beyond the default Instagram filters? Good decision! Nowadays, most companies consider that knowing the basics of Photoshop is not only useful but essential for professionals in many areas. From administration to marketing, knowing how to use Photoshop has become almost as necessary as knowing how to create a website. That’s why today I bring you Photoshop tutorial for beginners.
Knowledge within everyone’s reach
When it comes to image editing, the first thing that comes to mind is Photoshop, a program which is so closely related with photo editing worldwide that its name has even become the verb to describe the action of editing: “to photoshop this or that”. However, not long ago this program was still considered a secret and a complicated weapon that only graphic designers could use. Times change and today, thanks to the internet and the community of people dedicated to the creation of online tutorials, anyone can learn to edit their images with this program.
All you need to have at hand is the right guide to master this photo-editing tool. So you can erase imperfections and even add fabulous design elements. Well, here I am to show you how to use Photoshop.
How to use Photoshop: learning the basics
This tutorial uses the most current version of Adobe’s software, Photoshop CC 2019. Although the disparity is not huge, there are different things with respect to versions prior to CC, for example, CS6. To get started, simply run your version of Photoshop.
Create or open an image or a new document in Photoshop
Once the program is open, the first thing that pops up is a welcome window. On the left, you can see the New and Open buttons. If you press New, the document creation window will appear, where you can choose both the name and the size of the new document you are about to create. When selecting the size, you can find different measurements, such as pixels, inches, and centimeters, so you can use reference sizes without having to do conversions.
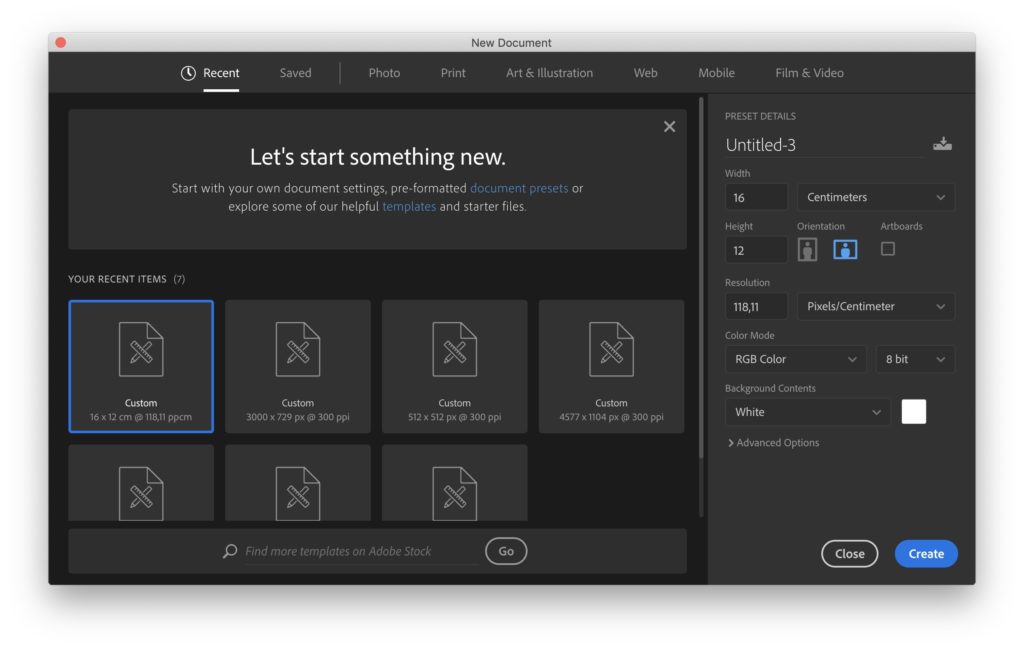
If you press Open, the file explorer will open and you will be able to open the file or image of your preference.
Introduction to Adobe Photoshop
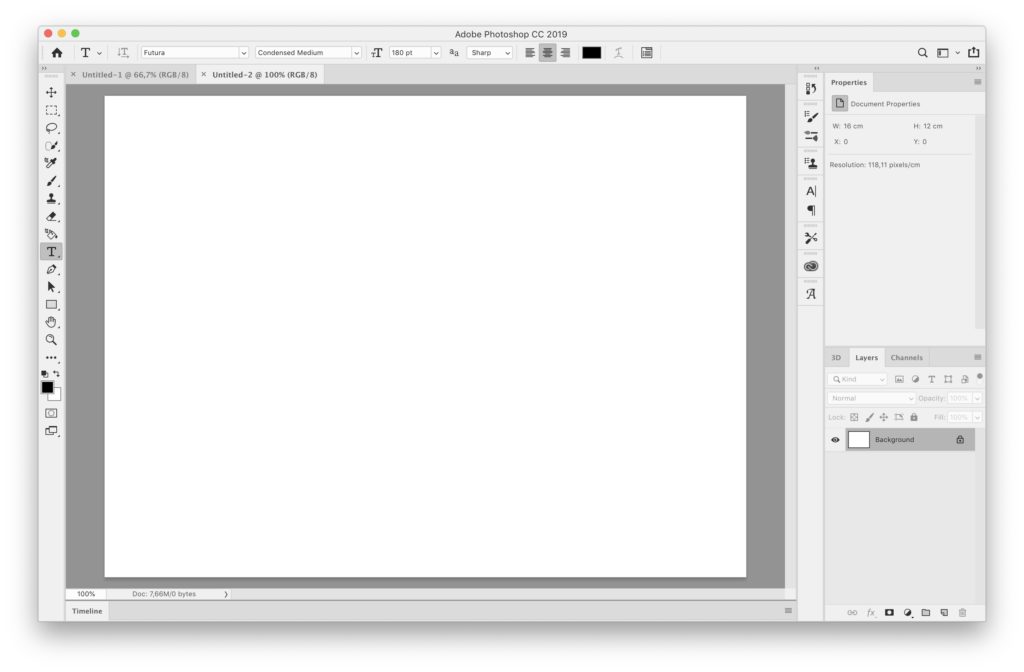
Once you have your image or document open, you will have in front of you the graphical interface of the program.

The working interface of Photoshop, which had evolved considerably in the previous version, now converges with that of the other programs in the Adobe package. It can be easily customized to suit users’ different professional practices. On the left, you will find the toolbar, the different menus at the top, the floating windows at the right and in the middle, your image or new document. This is the standard version of the workspace that you can select from the presets, but you can add or remove things at will, it’s completely customizable!
Change the background color of the program
If you are not comfortable working with the dark background, you can change it using the menu Photoshop (Mac) or Edit (PC) – Preferences – Interface. Click on the color you prefer to customize it. You can also specify colors for all three view modes. You’ll need to restart Photoshop to apply the changes you’ve made.
If you right-click (PC) or [Ctrl]-click (Mac) on the background of the software window, you can change the current color and choose a custom one.
How to Use Layers in Photoshop
In Photoshop, the creation of a new document can be done with a background, usually white, with the last color defined as background color, or even with a transparent background.
You can add one or more layers to the document; these layers allow you to work independently with the various elements that make up the image. This means that you can modify one layer without affecting the background of the document or the other layers.
Layers can be compared to transparent sheets superimposed on the background of the image and that allows you to see, when empty, the layers or background below.
The Layers panel allows you to perform all kinds of operations on layers: add, remove, dock, as well as create adjustment layers, fill layers and groups of layers. To display the Layers panel, click Window – Layers or press the [F7] key.
The panel shows the different layers of the document; the background layer always appears at the end of the list, next to a padlock icon that is shown to the right and indicates that it is locked. Effectively: the background cannot be moved, nor can opacity or a blend mode be applied to it. However, if you have chosen a transparent background when creating the document, it automatically appears as a layer and behaves as such.
At the bottom edge of the panel, you will find the buttons that allow you to act on the layers (create, delete, adjust, etc.).
The toolbar
If you have not modified the default look of Photoshop, the toolbar should appear on the left side of the interface, if it doesn’t appear, or you can’t find it in that location, click on Window > Tools and you will be able to access it.
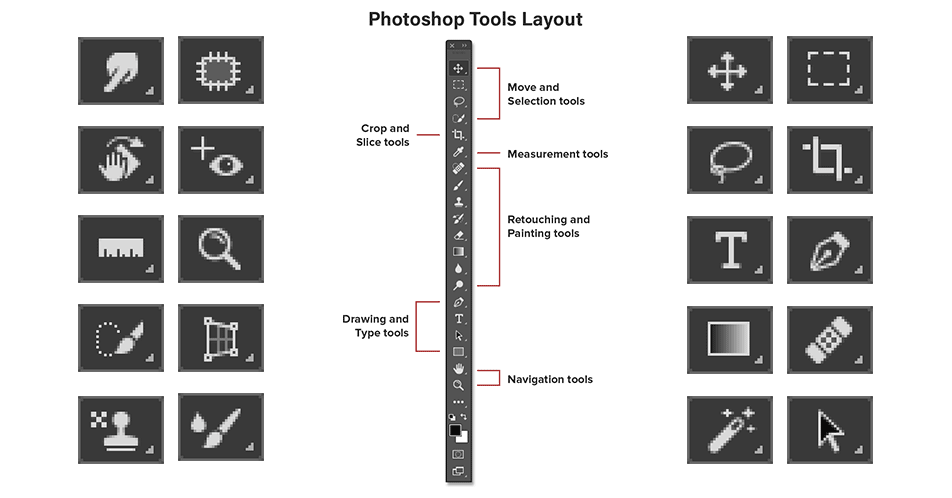
I’ll talk a bit about the most common tools, those more useful for beginners:
Move (V)
In the first tool icon, or at the top left, there is an icon with an arrow and a cross that will allow you to move a layer or the contents of a selection.
Its use mode is very simple, once you have selected this tool (through its icon, or the letter V), you will be able to move the content of a layer or a selection just by clicking on it and dragging it to the location you want. In addition to the mouse, you can also move the content of the layers, or the selection made, using the arrow keys on your keyboard, so you will have greater accuracy.
How to Use Marquee tools in Photoshop
The icon is shown as a second, or at the top right of the bar, allows you to access the selection tool. You can also select it with the M key.
Once you have selected the tool, you can define your selection by simply clicking from one corner of the selection and dragging the mouse to the opposite corner. By default, you can make rectangular selections, but if you click on the icon and hold down the mouse or right-click, you will see how you can also make other types of selections: elliptical, horizontal and vertical.
Depending on what you are selecting, it is useful to know that you can blur the edges of the selection through the “Fade” property, indicating the number of pixels to blur.
Tips:
- Invert the selection: Select > Invert (Shift + Ctrl + I).
- Select all: Select > All (Ctrl + A).
- Undo the selection: Selection > Deselect (Ctrl + D).
How to Use Lasso in Photoshop
For situations where you need to make selections in ways other than rectangles and ellipses, Photoshop offers three modes of a tool known as Lasso.
You can access it through its icon, or by pressing the L key. If you press L several times or leave the mouse pressed for a few seconds on this icon, you will see the 3 existing modalities:
- Lasso Tool: Allows you to make selections by pressing and dragging the mouse along the contour of the selection you want to make. As soon as you release the mouse, the tool will close the outline and define the selection.
- Polygonal Lasso tool: You can define the selection by defining the vertices of the polygon that will form the chosen selection. To define each vertex you must click on the left mouse button.
- Magnetic Lasso tool: This tool is characterized by “being attracted” by the edges detected in the image. The selection is built from the vertices you define, but the union between them are not straight lines (as in polygonal loops), but “intelligent curves” that follow the edges detected in the image.
Quick Selection and Magic Wand (W)
If with the tools we have described so far is not enough to get the selection you want, relax, Photoshop has different options that can help you achieve what you want and has a few more tricks, specifically two: “Quick Selection Tool” and “Magic Wand Tool”. With these tools, you can select contours that belong to a uniform region in the case of the first, or contours that have a similar color in the case of the second.
The magic wand is probably one of the most used tools when selecting skies. Select the tool and click on different points in the sky to select all those pixels that have a similar color.
When selecting this tool there are the following options:
- Mode of a combination of selections: addition, subtraction, intersection…
- Tolerance: The permissible “difference” between the color of the pixel clicked on and the colors that will make up the selection. Tolerance 0 means that only pixels of identical color will be selected.
- Smooth the contour of the selection.
- Require the selection to include contiguous pixels.
- Show all the layers when composing the selection or just look at the layer you are working on.
The “Quick Selection” tool, on the other hand, emerged in Photoshop CS3 and is a tool that carries out the selection more intelligently, considering properties such as texture or brightness at the time of obtaining the selection.
In the case of this tool, the available options are:
- The combination mode of the selections to be made.
- The size of the brush that will be taken for, starting from the pixels selected by that brush, to be able to establish the final selection.
- The option to sample all layers or consider only the current layer.
- The option to automatically improve the selection. It is recommended to keep this option enabled at all times.
These tools, together with the ones above, will allow you to make any selection you can think of.
Not surprisingly, the ability to accurately select a set of pixels will be essential for further retouching. That is why Photoshop has not spared in the number of tools intended for this purpose.
How to Use the Clone Stamp Tool in Photoshop
One of the most notable advantages of Photoshop is its ability to retouch small imperfections in photos. There are several shortcuts to alter a photo or image and improve some imperfections, one of these resources is the “Clone Stamp Tool”.
Find the “Clone Stamp Tool” in your toolbox or use the “S” shortcut.
The trick of a great retouch is to find the area of your photo with the ideal color and texture so you can duplicate and reuse this combination in the part of the photo you want to edit. To do that, first, choose the size of your brush. You can use your brackets – [ ] – to enlarge or minimize the size.
Scroll over the area you want to copy from, and when you find it, press “Alt + click” to copy the area. Then simply click with the mouse on the area you want to paste into.
Repeat steps 1 to 3 often to add a variety of tones and textures to your retouches. Remember that variety is what differentiates an acceptable retouch from an impeccable one.
Healing brush tool (J)
If you’re looking to do some magic to retouch photos, the Healing Brush tool is perhaps your best option. Find it under the Spot Healing brush tool on your toolbar.
This feature can be used to match colors in the area you’re retouching and, unlike the “Clone stamp tool,” the tool takes into account texture and hue to add a multidimensional border to your edit. Also, you don’t need to first select the area with which you want to combine the color, as with the Clone Stamp tool. Instead, simply click to adjust the imperfections (e.g., a pimple of the face) in the desired area. Here you also can use the square brackets to adjust the size of your brush and start editing.
Dodge tool (O)
This tool brightens the pixels wherever you use it. In short, it’s the perfect Photoshop tool for removing dark circles under the eyes. If you’re looking to give your image a brighter look, this is the ideal tool to do it.
Blur tool
It can happen that all you need from Photoshop is to remove a few expression lines. That’s where the Blur tool comes in, which you can find in your Photoshop toolbox and which looks like a tear. Use this function to smooth out small imperfections such as wrinkles around the eye or mouth area and simply blur them into the background. Be cautious and remember not to exaggerate because instead of improving your image you may end up ruining it.
Other things you can do in Photoshop
Photoshop has more tools than you can get on the toolbar, I’ll show you a couple:
Adjustment layers
This is a great Photoshop resource that allows users to apply color or tone alterations to an image without modifying the original photo. Have you ever wondered what an image would look like if you changed the color of the sky, for example, from light blue to purple? Let your imagination run wild and adjust the color and hue in the elements of your image by adding a top layer (instead of changing the image completely).
The best thing about this feature is that, by adding that additional layer, you can completely reverse the changes while keeping the rest of the image intact. To find the “Adjustment Layers” tool, go to the bottom of the “Layers Panel” (a black and white circle icon). There you will find it.
Resize, rotate, or flip an image
Do you want to rotate your image to the right or give it a full twist? Start by clicking on “Edit” and “Transform”. Then you can choose the action you want: “Resize”, “Rotate” or “Flip”.
You can also use these shortcuts to make life even easier: press Ctrl + T on your keyboard and a box will appear around the image pointing to the transformation zone. This means you can now resize your image. The best way to do this is to place the cursor on one of the corners of the rectangle and then drag the corner. In Photoshop versions prior to CC 2019, in order to resize an image while maintaining the aspect ratio, it was necessary to hold down the “Shift” key as you dragged around the corner. In the new version, if you change the size clicking on the corner, Photoshop automatically understands you want to maintain the aspect ratio. When you’re done, just press “Enter” and you’re done!
To flip or rotate your image vertically or horizontally, press Ctrl + T and then right-click. A pop-up window will appear with some options to rotate and flip the image. Choose the action you want and press Enter when you have finished editing.
Layer Styles
This is a simple way to add some dynamism to your image. Layer styles are special effects that can be quickly applied to individual layers of your image. Simple: double-click on a layer and then choose the effect you want.
You can select from a variety of functions, add a stroke or glow, add a shadow and much more with just one click.
Final words
Photoshop is a very complete and extensive program, besides having tools and options for both beginners and advanced users, so there are tutorials on how to use Photoshop for all levels. Remember, practice and perseverance is what will make you master the program perfectly, so keep up the good work.